Quite often website owners need to change the widget background color of their WordPress site. It can get quite tricky if your theme does not have that functionality. In this post, I will show you how to change the widget background color in WordPress.
Let us get started!
There are two methods to achieve this goal. Both methods make use of CSS.
One method requires the use of a plugin and the other one can be carried out without a plugin. The method which makes use of a plugin is easier and beginner-friendly.
Method 1 – Using Widget CSS Classes Plugin
Step 1 – Download, Install & Activate the Widget CSS Classes from your WordPress Dashboard. It is a widely used plugin currently having over 100,000 active installations.
Step 2 – Go to Appearance >> Widgets
Step 3 – Click on Primary Sidebar or Footer or wherever the widget whose background color you want to change, is located.
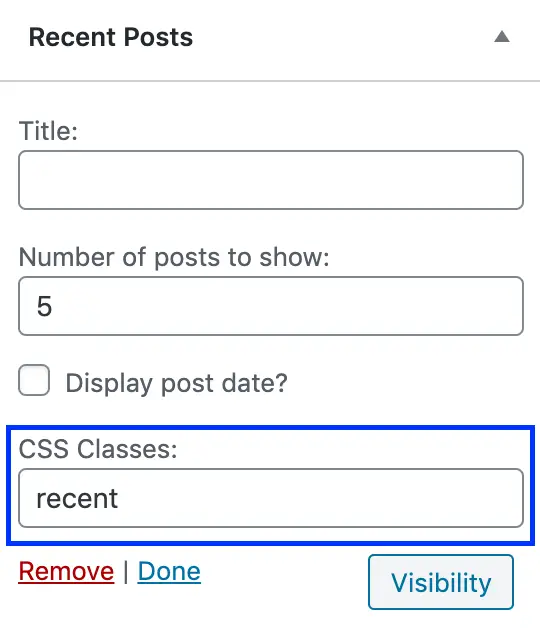
Step 4 – At the bottom, you will see an additional field named CSS Classes. Here you can add a distinct CSS class for the particular you want to edit. I have named it recent for the Recent Posts widget as shown in the screenshot below.

Step 5 – Add the following code to Additional CSS option in the Customizer of your theme. Change the hex code (#858585 in this case) to the one you like.
.recent {
background-color: #858585;
}
Step 6 – Publish and that’s it! Enjoy the new background color of your widget in WordPress.

Method 2 – Without using Plugin
In this method, we can take advantage of the fact that WordPress assigns classes to widgets by default. Our job is to find out the name of that class and apply custom styling to it using CSS.
Step 1 – Find out the class of the widget whose background color needs to be changed. You can do this using the inspect element tool in most browsers. Right-click on the widget you want to edit and click on inspect element.
Step 2 – A panel as shown below will open at the bottom of your screen. As you can see below, there are two classes assigned to the recent posts widget namely widget and widget_recent_entries. However, widget is a generic class that is used for all widgets, we need to use the class specific to the widget we need hence we use widget_recent_entries.
OR
You can also use the ID to select the widget. In this case, the ID is recent-posts-1. The selector for ID is different so make sure to note the change in code in the next step.

Step 3 – The rest of the steps are similar to the previous method. Add the following code to Additional CSS.
.widget_recent_entries {
background-color: #858585;
}
OR
#recent-posts-1 {
background-color: #858585;
}
Step 4 – Click on publish and you have successfully changed the background color of the widget as desired.
Conclusion: How to Change Widget Background Color in WordPress
Feel free to try out various colors to find a suitable match for your site. Also if you need more information about CSS selectors then you can read about them here.
In case you are facing any specific issue on your site, feel free to comment below.

Thanks for this. I used method 2, which worked for all but a sliver under the widget title. Can you help?
nevermind. I got it!
Glad to hear 🙂
Hello Melba,
i have a question, new WordPress User here.
Started Yesterday with the frist steps, now how can i change the color in the comment/or block Boxes? It is currently white…i have 3 Boxes there “Video”, “Hello World” and a 3rd one.